Rabbit Farmer's various VW Projects
-
Rabbit Farmer
- Posts: 2260
- Joined: Wed Jun 25, 2003 11:37 pm
- AntiSpam: No
- Location: Earth
- Contact:
Re: Rabbit Farmer's various VW Projects
Correct. Normally the idle is controlled by the VW ECU. My car is running 034EFI.... I believe this can control the idle (makes sense), but I do not have a computer to easily connect to the car whenever I need to adjust the idle.
Go Fast VW & Audi parts at FastAddiction.com
-
Rabbit Farmer
- Posts: 2260
- Joined: Wed Jun 25, 2003 11:37 pm
- AntiSpam: No
- Location: Earth
- Contact:
Re: Rabbit Farmer's various VW Projects
Good times at the Okemo #1 hillclimb in Ludlow, VT. Strange weather (cold, wet, sometimes sunny.... unlike the usual 90 degrees and all sun).
The car did quite well at the event... 1st in class (Saturday, I was the only one in my class, so don't get too excited), 7th overall at 2:29.07 (nice!) and second fastest in the straight (111 mph... darn Super Chicken got me at 113 mph).
Doing some things to the car prior to Okemo #2 in a few weeks. Swapping out the hot side of the turbo for a small one and safety wiring all the hot side bolts as they backed out in prior years (seem okay this year, but it has been cooler). Naturally a retune is in order at VEMS.us.
Video from this past weekend posted on Vimeo as Youtube's quality hasn't been there for me. Make sure to watch in 1080HD. Enjoy.
http://vimeo.com/170451454 <-- video link
Steve
Go Fast VW & Audi parts at FastAddiction.com
-
Rabbit Farmer
- Posts: 2260
- Joined: Wed Jun 25, 2003 11:37 pm
- AntiSpam: No
- Location: Earth
- Contact:
Re: Rabbit Farmer's various VW Projects
Half a summer worth of updates....
Golf is normally near 118 mph in the straight at Okemo, but I was running at 111 mph for some reason. It was slower. It was not smoking.
Anyway. After checking things out at Kales Custom, I was off a bit with the compression on two of the cylinders.
My first thought is "hole in the piston" but the car was not smoking at all.
Took the engine apart. While in it, inspected the clutch/flywheel.... looked great!
Pistons, engine block, and head looked good to me (untrained eye).
Hmmmmmm......
Disassembled.
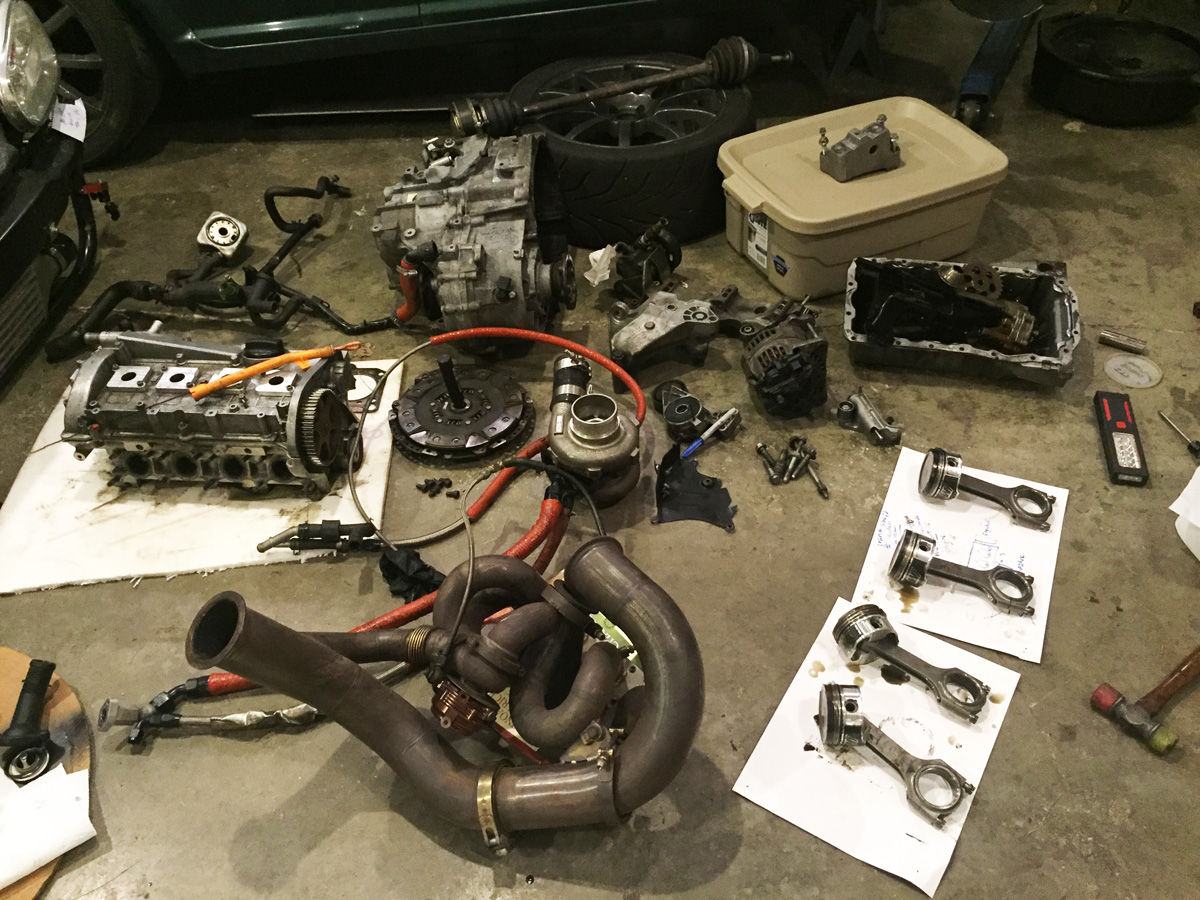
Well, not related to the compression issue, I got to add something else to my carnage wall of shame... a broken main bearing cap. AND... there was nothing wrong with the bearing. Good thing I had the engine apart.
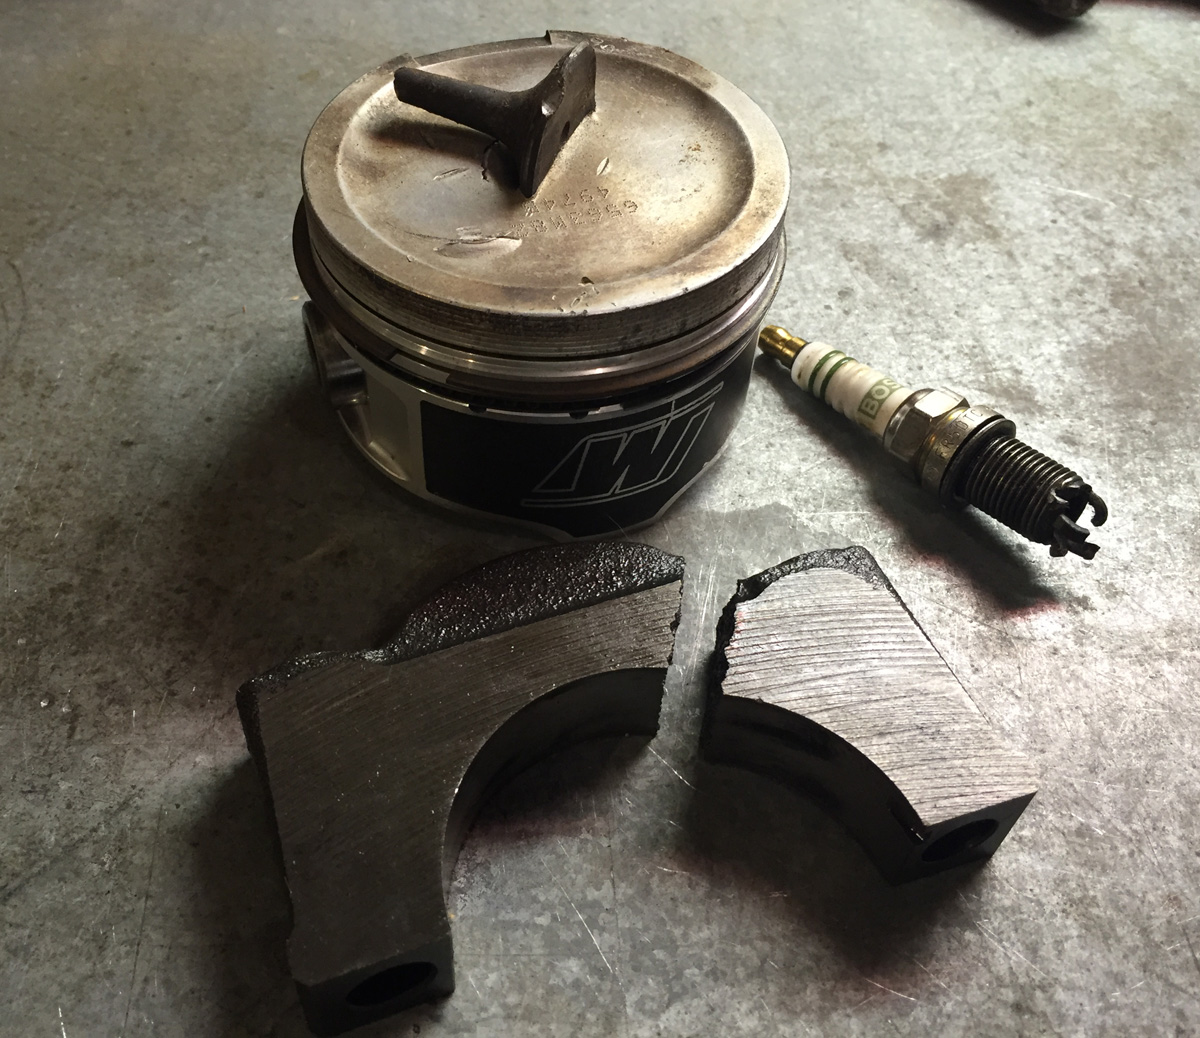
Being new to the whole "broken main bearing cap" club, I thought bringing a bearing cap from another engine the machine shop could make it work. Well, YES and NO. They would have to line bore the caps so they worked with the crank; they send out for line boring; and the "big V-8" guy didn't have one that small.
So.... I brought him a new block. Problem solved!
Not.
I get a call from the machine shop (RPM in Georgia, VT) and they tell me they can't put the pistons in the cylinders. They don't fit. They are too big? I didn't recall boring anything.
I also did not recall what I had for breakfast.
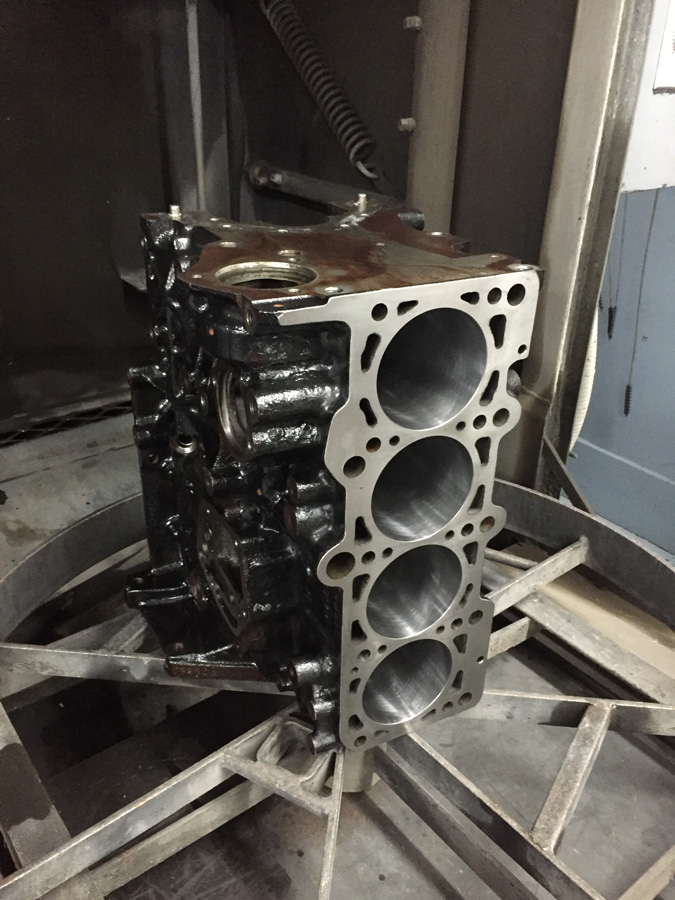
Turns out I did .5mm oversize on the pistons at one point as the block was dorked up from one of the previous engines going the way of the Doo-Doo Bird.
Bored and cleaned block with new piston rings (all gapped).
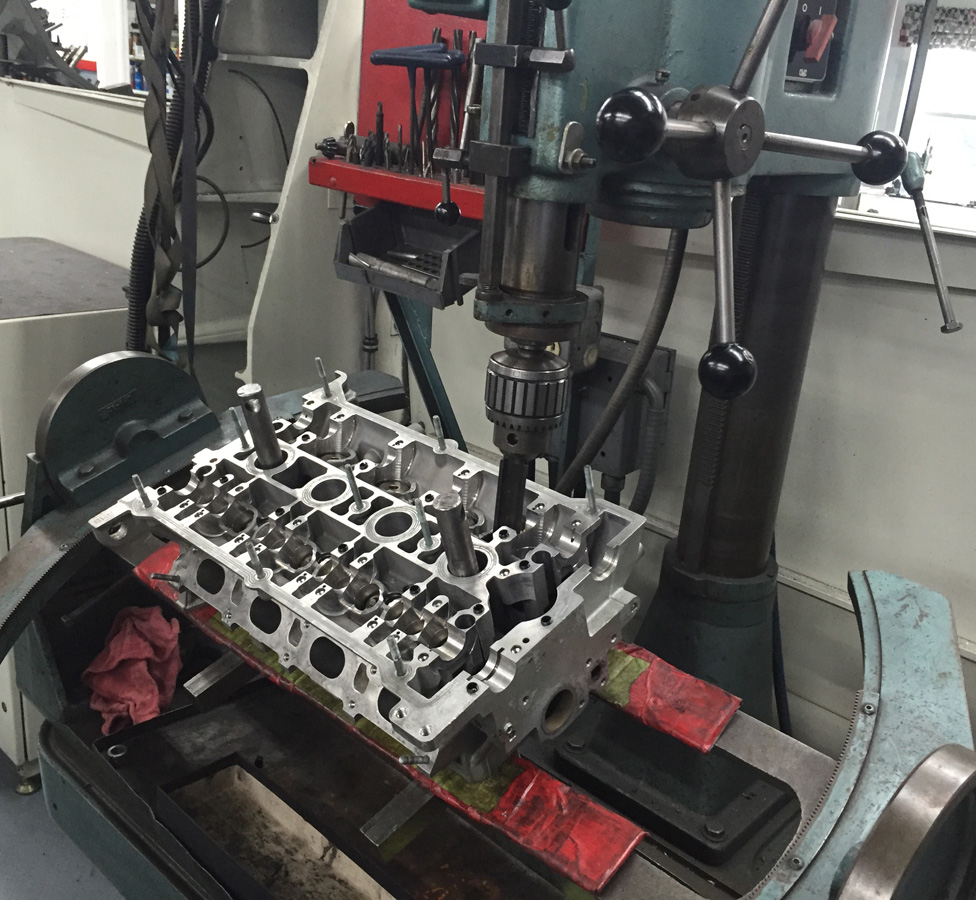
So... the source of the compression issue was actually the seats for the valves. I guess running a bit of boost for 3 years isn't good for longevity of those internal engine parts.
Cleaned up valve seats and new valve seals (all 20)..... figured we were in there anyway.
Everything is back in my garage.... a project for tomorrow as I have the day off.
Meanwhile, while summer is slowly drawing closer to winter, the New England Hillclimb Association (NEHA) hillclimb events continue. Well, I just have to drive, ya know.
Enter the world's fastest red, automatic, Daewoo Lanos with white stickers. It needs all those qualifiers to remove the other 7 Daewoos from the population. I drove it at Okemo #2 and Burke #1. Photo of the World Famous Non-Factory Sponsored Superduper Intergalactic Racing Team Daewoo Lanos (at Okemo) with Julie (little woman) in the 2009 Subaru WRX (my car!!!!) in back of me.
I had lots of time to think in the straights.

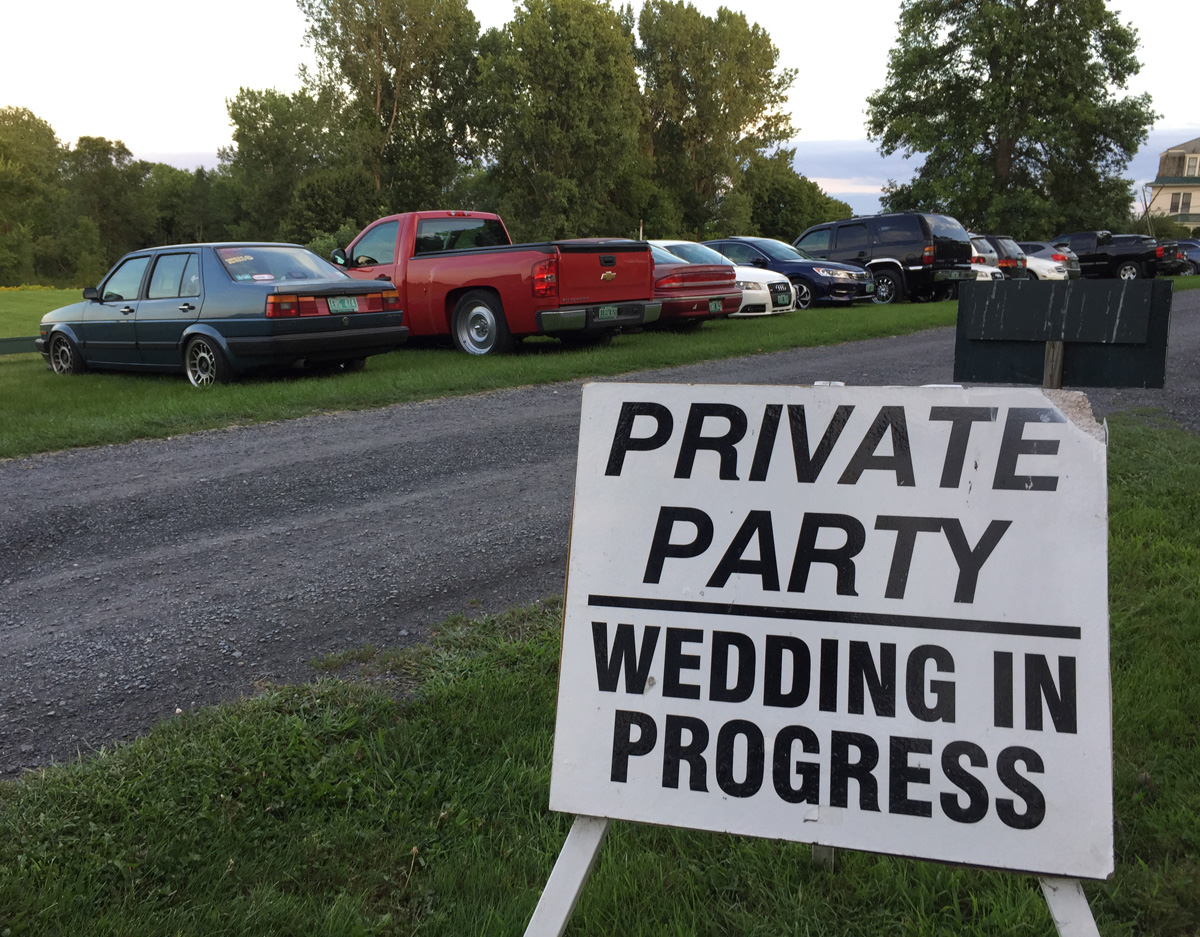
In other news... went to wedding with a bunch of local VW club people (Dubsnorth). Had a great time. No one told me about the open bar.
Ascutney #2 is next weekend (favorite hill). I don't think the Golf will be ready with putting everything together, breaking it in, and dyno tuning it. Back to driving the Daewoo.
Then.... October brings about the Mt. Philo hillclimb. Another great event, though, sadly, the last event of the year.

Nothing too exciting.... but I'm still alive.
Steve
Golf is normally near 118 mph in the straight at Okemo, but I was running at 111 mph for some reason. It was slower. It was not smoking.
Anyway. After checking things out at Kales Custom, I was off a bit with the compression on two of the cylinders.
My first thought is "hole in the piston" but the car was not smoking at all.
Took the engine apart. While in it, inspected the clutch/flywheel.... looked great!
Pistons, engine block, and head looked good to me (untrained eye).
Hmmmmmm......
Disassembled.
Well, not related to the compression issue, I got to add something else to my carnage wall of shame... a broken main bearing cap. AND... there was nothing wrong with the bearing. Good thing I had the engine apart.
Being new to the whole "broken main bearing cap" club, I thought bringing a bearing cap from another engine the machine shop could make it work. Well, YES and NO. They would have to line bore the caps so they worked with the crank; they send out for line boring; and the "big V-8" guy didn't have one that small.
So.... I brought him a new block. Problem solved!
Not.
I get a call from the machine shop (RPM in Georgia, VT) and they tell me they can't put the pistons in the cylinders. They don't fit. They are too big? I didn't recall boring anything.
I also did not recall what I had for breakfast.
Turns out I did .5mm oversize on the pistons at one point as the block was dorked up from one of the previous engines going the way of the Doo-Doo Bird.
Bored and cleaned block with new piston rings (all gapped).
So... the source of the compression issue was actually the seats for the valves. I guess running a bit of boost for 3 years isn't good for longevity of those internal engine parts.
Cleaned up valve seats and new valve seals (all 20)..... figured we were in there anyway.
Everything is back in my garage.... a project for tomorrow as I have the day off.
Meanwhile, while summer is slowly drawing closer to winter, the New England Hillclimb Association (NEHA) hillclimb events continue. Well, I just have to drive, ya know.
Enter the world's fastest red, automatic, Daewoo Lanos with white stickers. It needs all those qualifiers to remove the other 7 Daewoos from the population. I drove it at Okemo #2 and Burke #1. Photo of the World Famous Non-Factory Sponsored Superduper Intergalactic Racing Team Daewoo Lanos (at Okemo) with Julie (little woman) in the 2009 Subaru WRX (my car!!!!) in back of me.
I had lots of time to think in the straights.
In other news... went to wedding with a bunch of local VW club people (Dubsnorth). Had a great time. No one told me about the open bar.
Ascutney #2 is next weekend (favorite hill). I don't think the Golf will be ready with putting everything together, breaking it in, and dyno tuning it. Back to driving the Daewoo.
Then.... October brings about the Mt. Philo hillclimb. Another great event, though, sadly, the last event of the year.
Nothing too exciting.... but I'm still alive.
Steve
Go Fast VW & Audi parts at FastAddiction.com
-
Rabbit Farmer
- Posts: 2260
- Joined: Wed Jun 25, 2003 11:37 pm
- AntiSpam: No
- Location: Earth
- Contact:
Re: Rabbit Farmer's various VW Projects
Having some fun with the video from the Ascutney hillclimbs this year.... involved the Golf 1.8t and a stock 2001 Daewoo Lanos.
Go Fast VW & Audi parts at FastAddiction.com
-
Rabbit Farmer
- Posts: 2260
- Joined: Wed Jun 25, 2003 11:37 pm
- AntiSpam: No
- Location: Earth
- Contact:
Re: Rabbit Farmer's various VW Projects
And the other half of summer.....
Spending time rebuilding an engine with no corners cut... well, one, but that was by accident. I did pay for it.
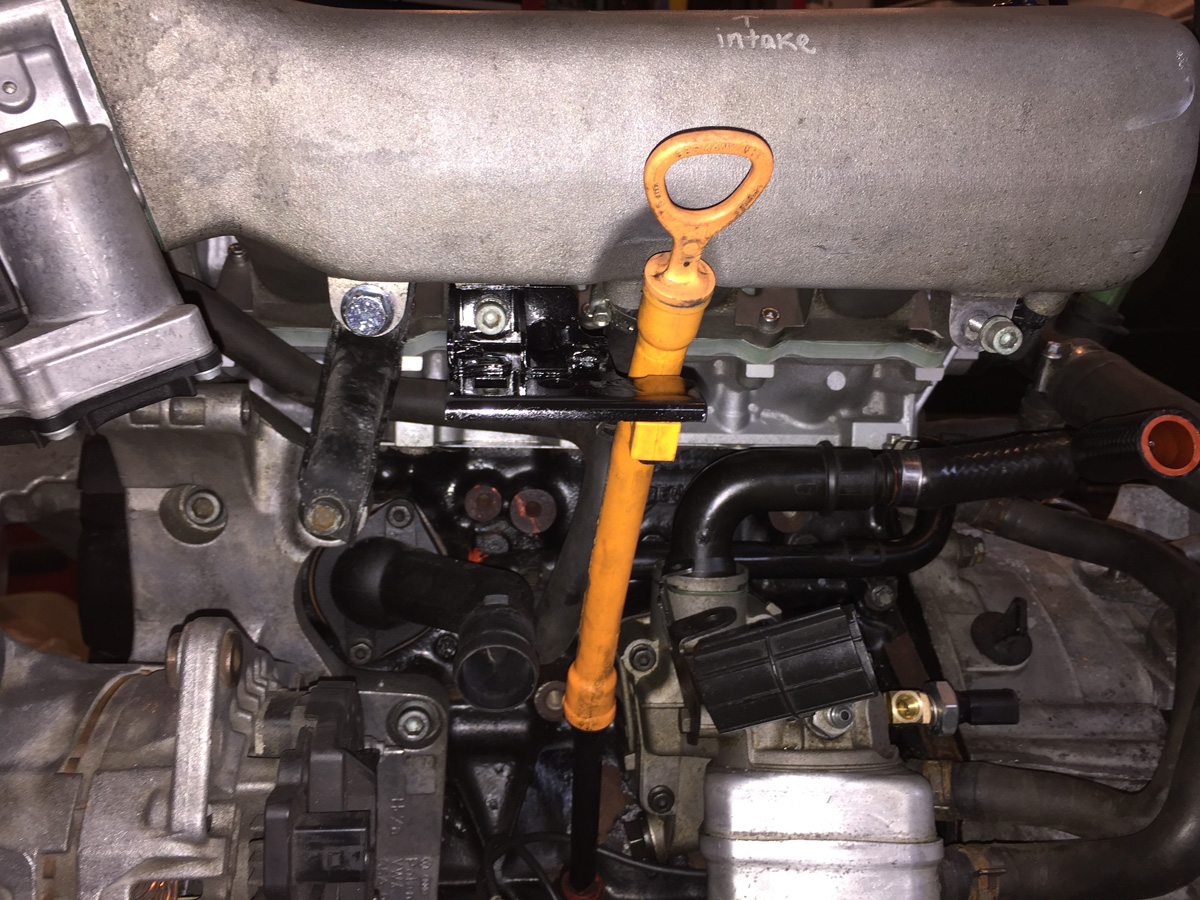
I had one of these for my Rabbit, but never for the 02J (5-speed) or 02M (6-speed).... that usually involved vice grips and screwdrivers. Enter the proper flywheel holder (not recommended for the crankshaft bolt). Easy to use and very effective.

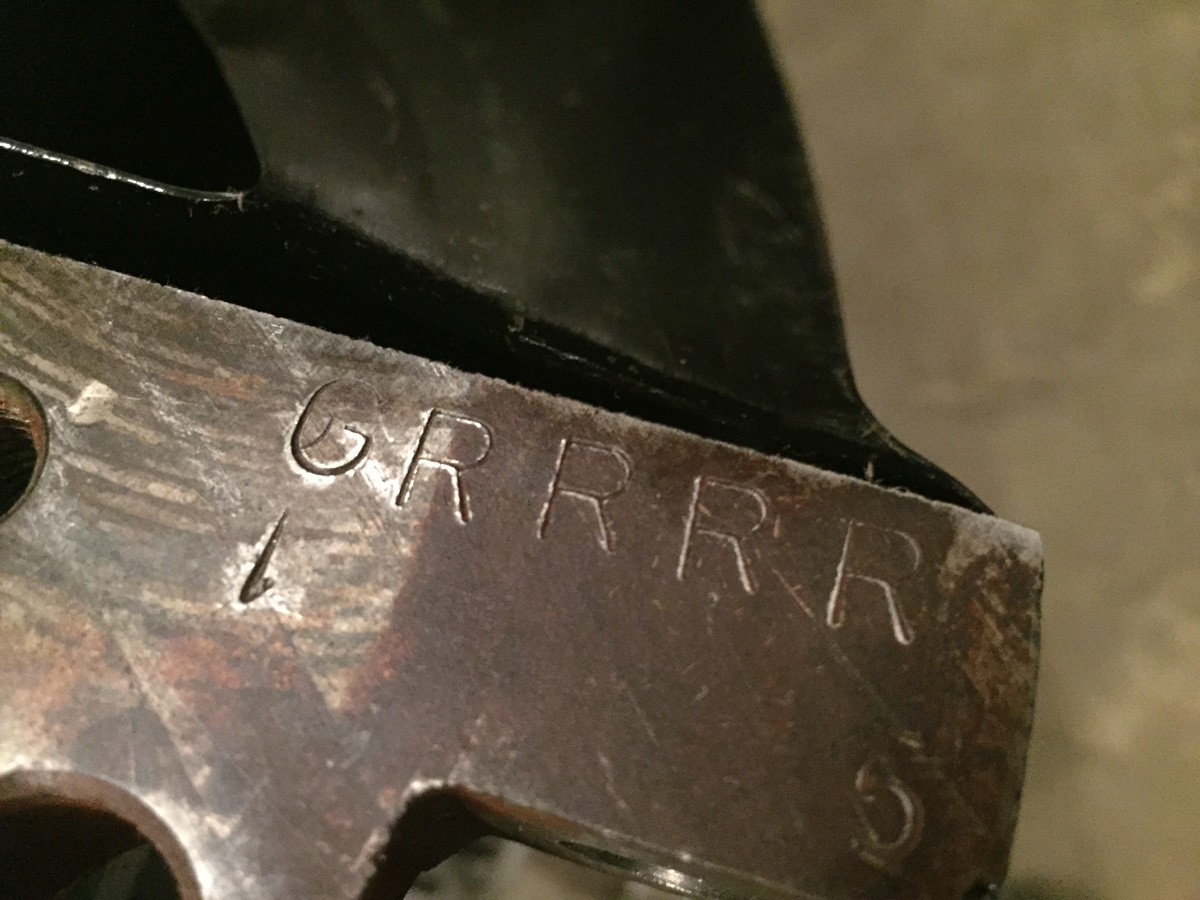
The new block code is "Grrrr".... no idea what it means, but it seems fitting.
Nothing too exciting from the engine build point of view. Bored the block to accept the .5mm oversized piston (82.5mm vs the standard 82mm), new valve seals, new rings (naturally), and everything was cleaned and machined by http://www.rpmenginesvt.com (Georgia, VT)
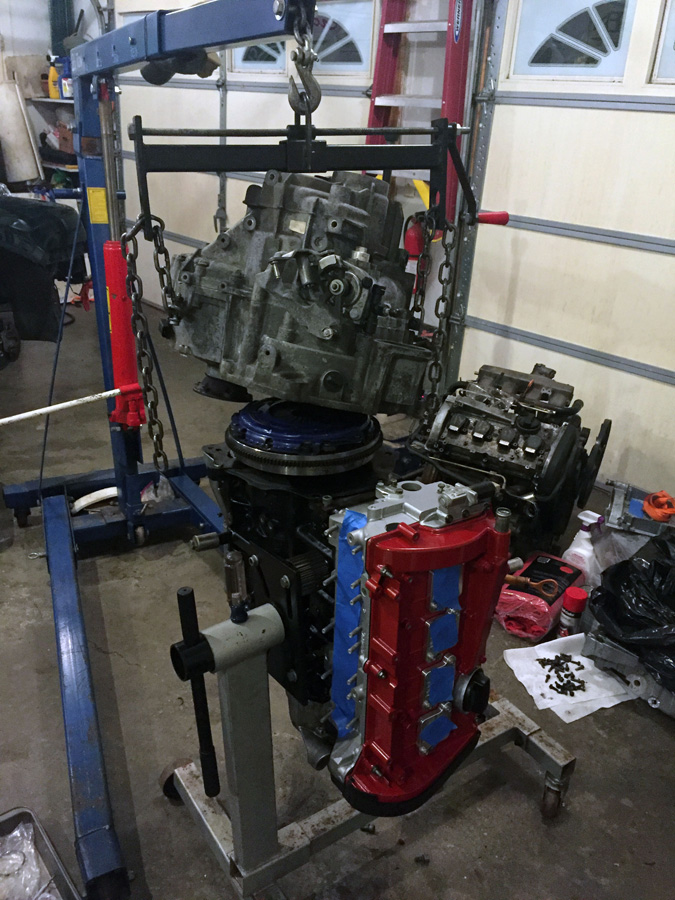
Add on the transmission... my new favorite (and easy) way to install the transmission.... unless you have to bolt on the oil pan afterwards (where rotating the engine/trans as a single unit is a royal PITA).
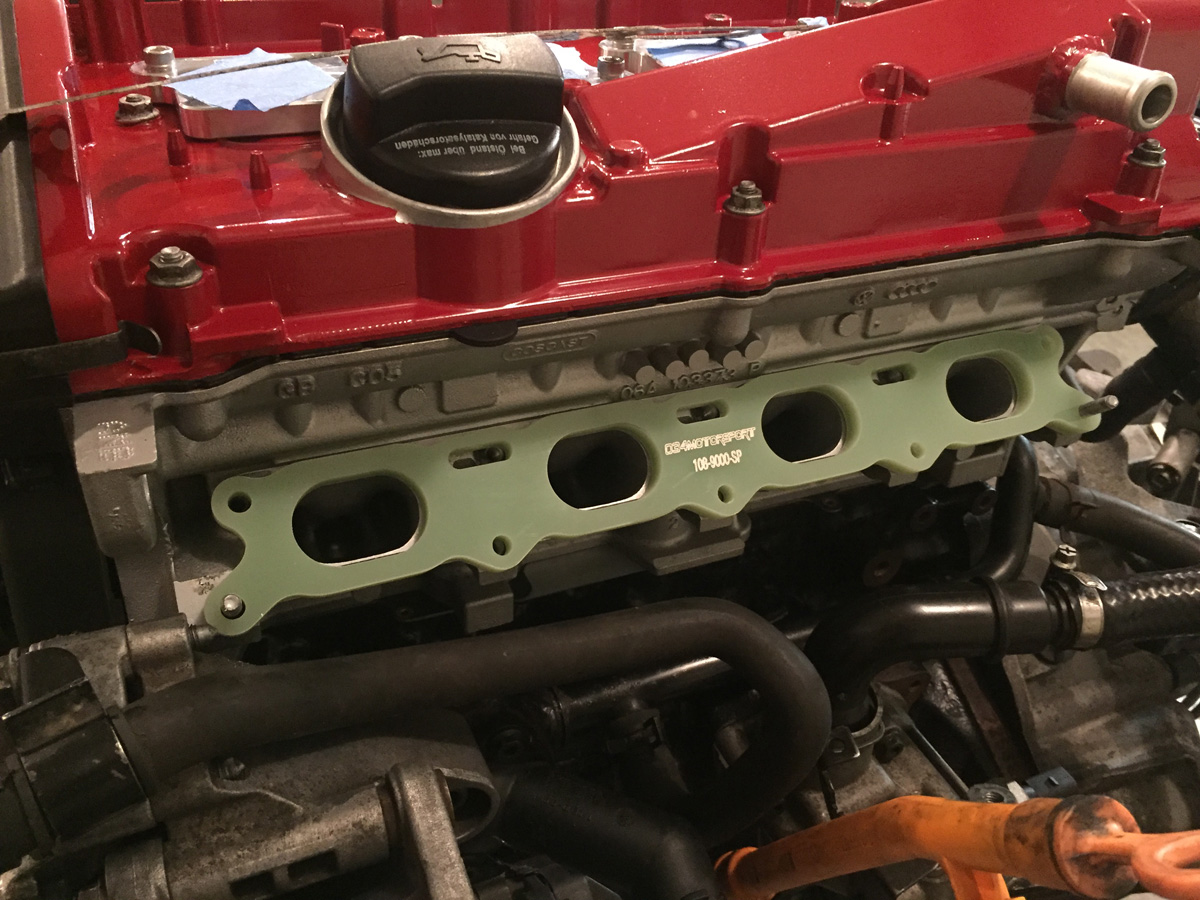
Something new that I am trying... and it led to another series of challenges... is the intake manifold Phenolic spacer. Now, what does Phenolic mean? It is a thermal do-hickey that prevents heat from the engine block from transmitting to the intake manifold. Reduce heat in the intake manifold means more power (there is a reason that we have FMICs!)..... or, it is really good marketing.
One thing I noticed when taking apart the engine is that the fuel injectors were very loose in the injector cups. It was like throwing a hot dog down a hallway.
So, new injector cups were in order along with new rubber o-rings on the injectors.
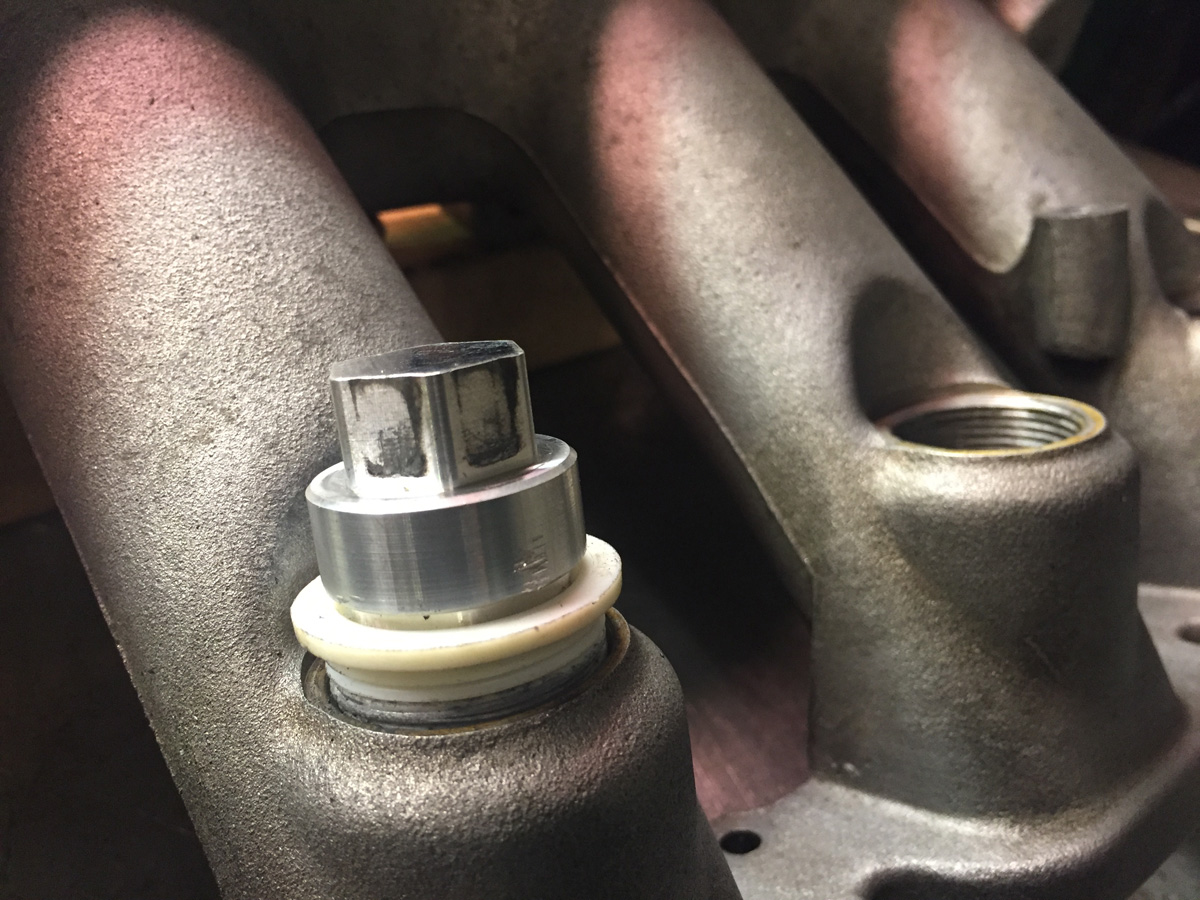
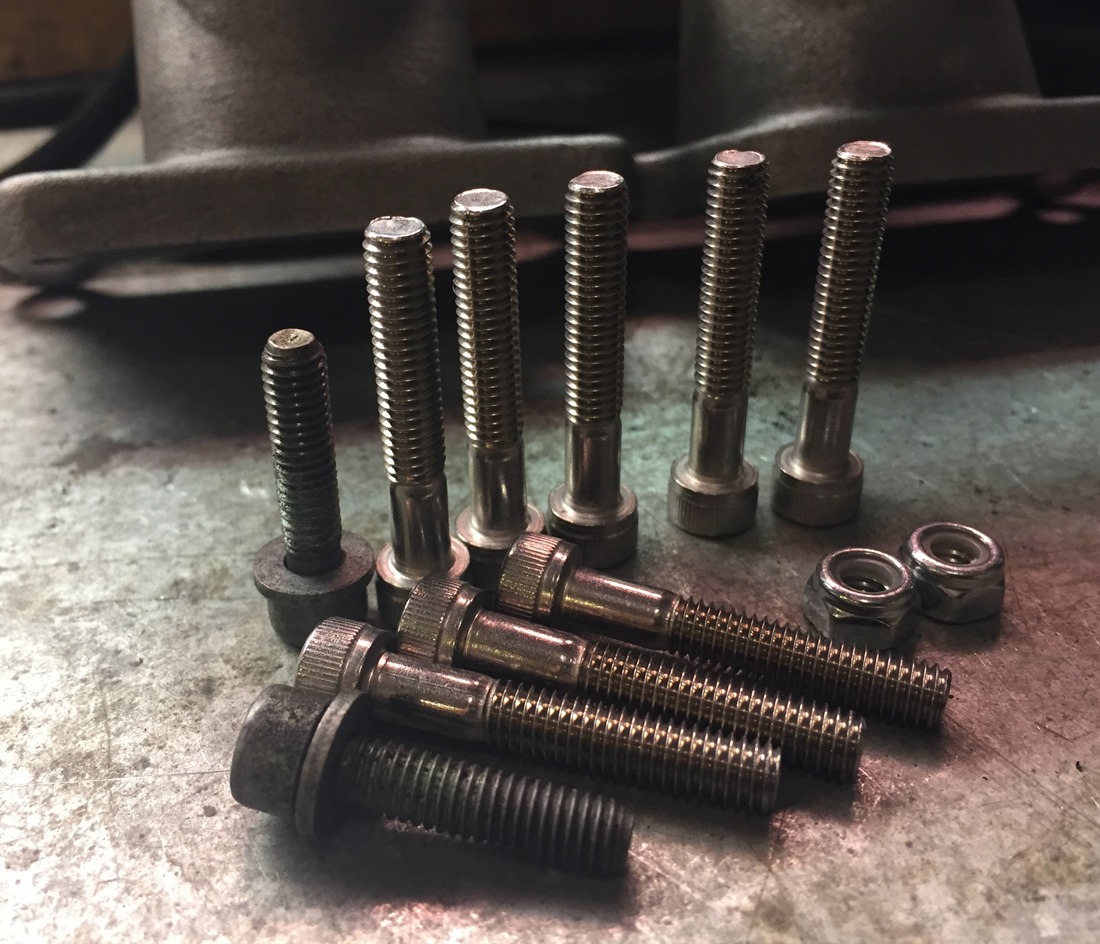
The kit from 034Motorsports also included longer intake manifold bolts and locking nuts. Shorter stock bolts vs. longer 034 bolts pictured.
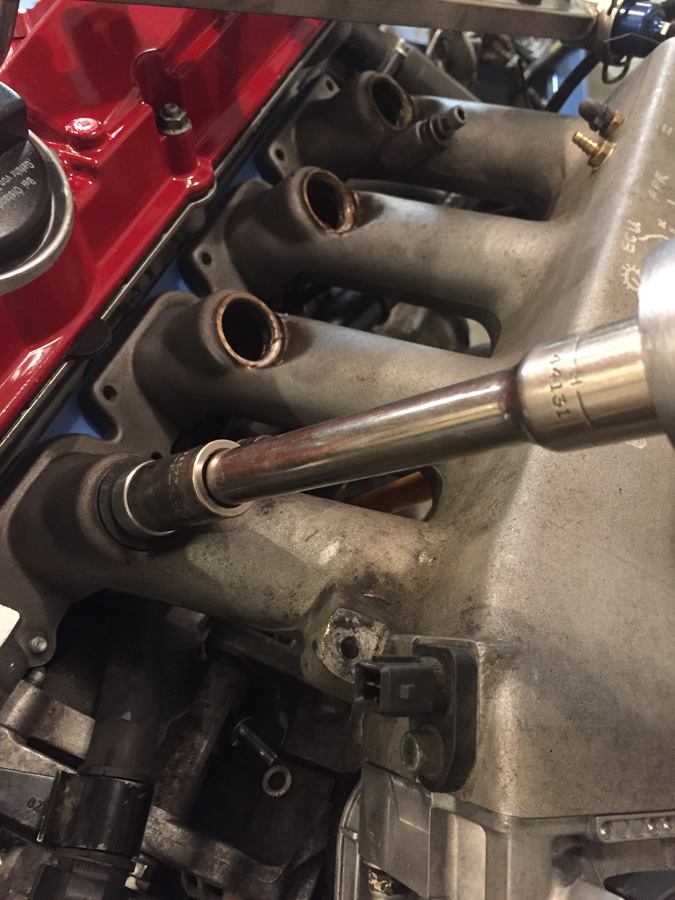
All assembled and pretty. While I was there, I had to oversize and tap the holes that held the fuel rail and throttle cable holder (another do-hickey) as the 7mm holes in the aluminum intake were less than threaded.

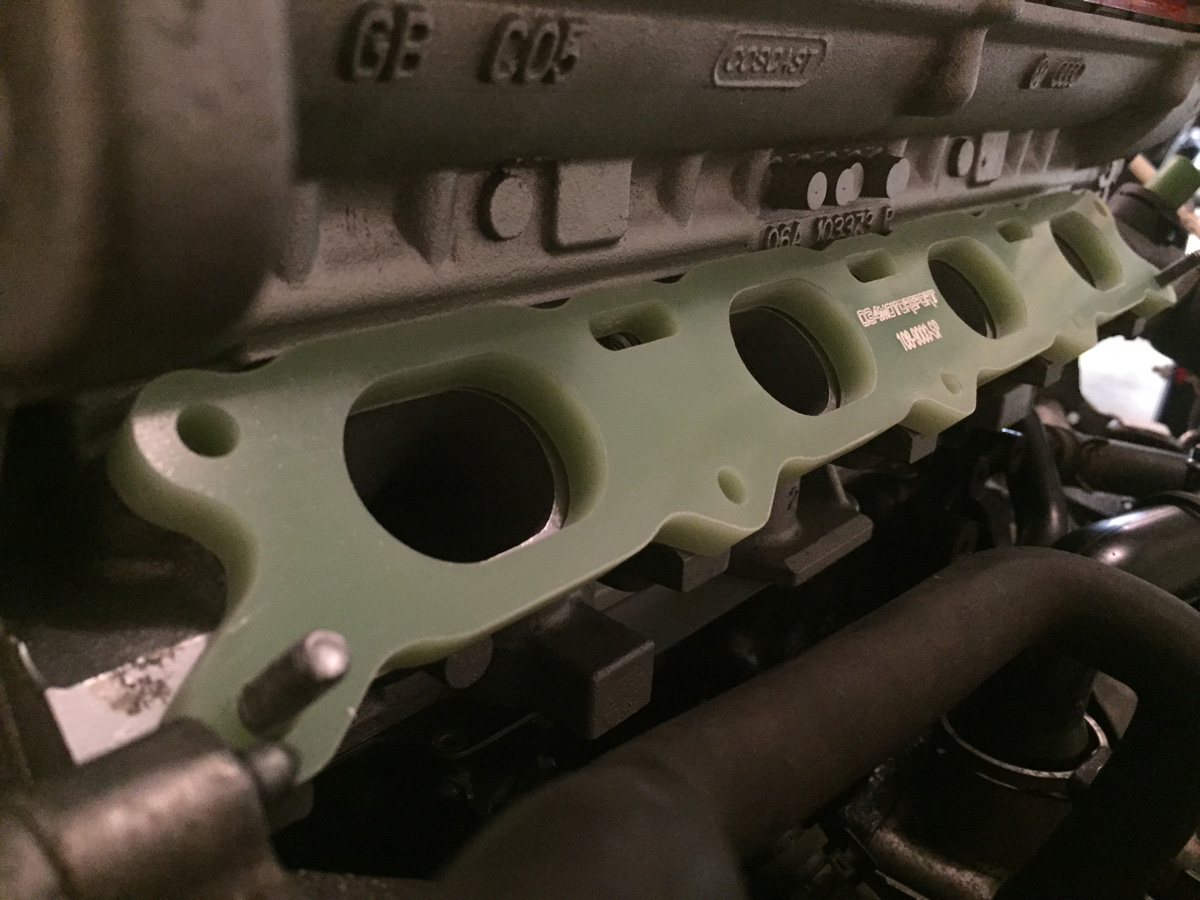
Showing the thickness of the spacer. At least 300 more wHP, I figure. Throw in some stickers and that is 305 wHP more! Mother of God! (Super trooper reference)
Sad part, the internet must have an end.... search for "Mother of God" and it just starts repeating on Google.

Anyway, back at the ranch....
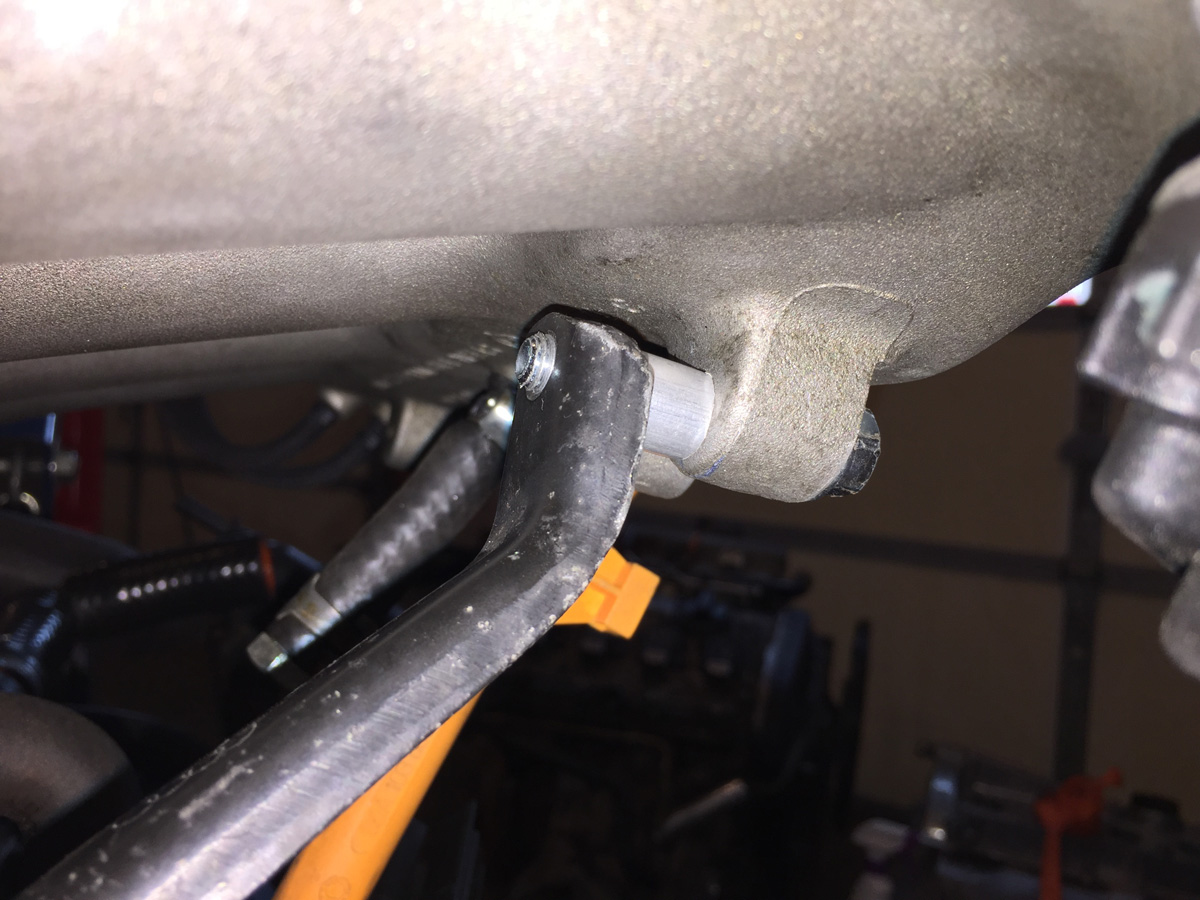
New challenge with the spacer is that the bracket that holds the intake manifold in place, something that I have not used for years, but figured the additional leverage from the extended mounting point with the spacer would warrant it, does not line up anymore. English teacher would have shot me for that terribly assembled sentence. Oh well.
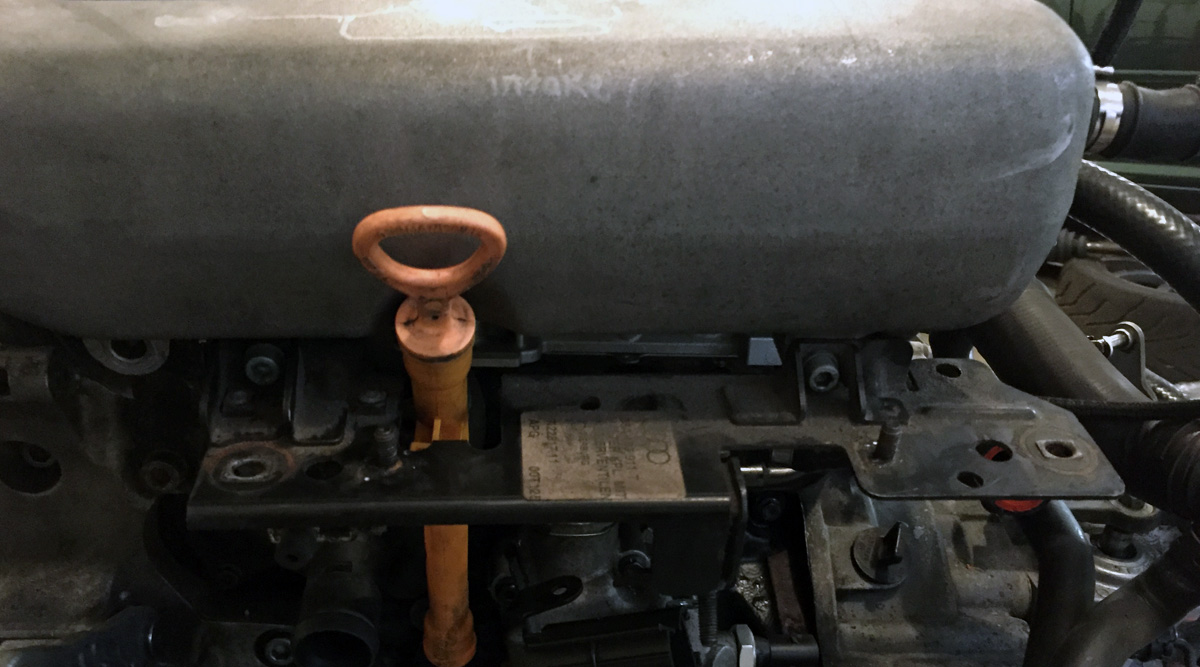
Also, at Ascutney #1 (2016), I dumped a bit of oil on my skid plate because the plastic oil dipstick was dislodged (or was never correct pushing into place). I haven't used the stock dipstick holder down do-hickey thing-ah-mabob for years. Something else I was going to solve while putting the engine back together.
Image of the stock holder-downer thingy. It is quite long as it holds various electronic bits, emissions VTAMs, blacks tubes, and other various things that I do not need. VTAM is an old IBM term for those of you playing the home game. I mounted the stock brace (that I had to grab from a junk car recently as I discarded mine years ago) to give me some ideas of what I could do. The right most bolt is currently in service holding the Kales Custom oil separator. I could use the stock bracket and the oil separator with the stock bolt, but all I needed was something simple to hold down a flimsy plastic tube. Enter Mr. Hacksaw and Mrs. Dremel.
Longer bolt installed with aluminum spacer. I had to flatten out the brace a bit to extended it and then bend the end so that the bolt hole would align with the hole on the intake.
Cut down the bracket for the dip stick....
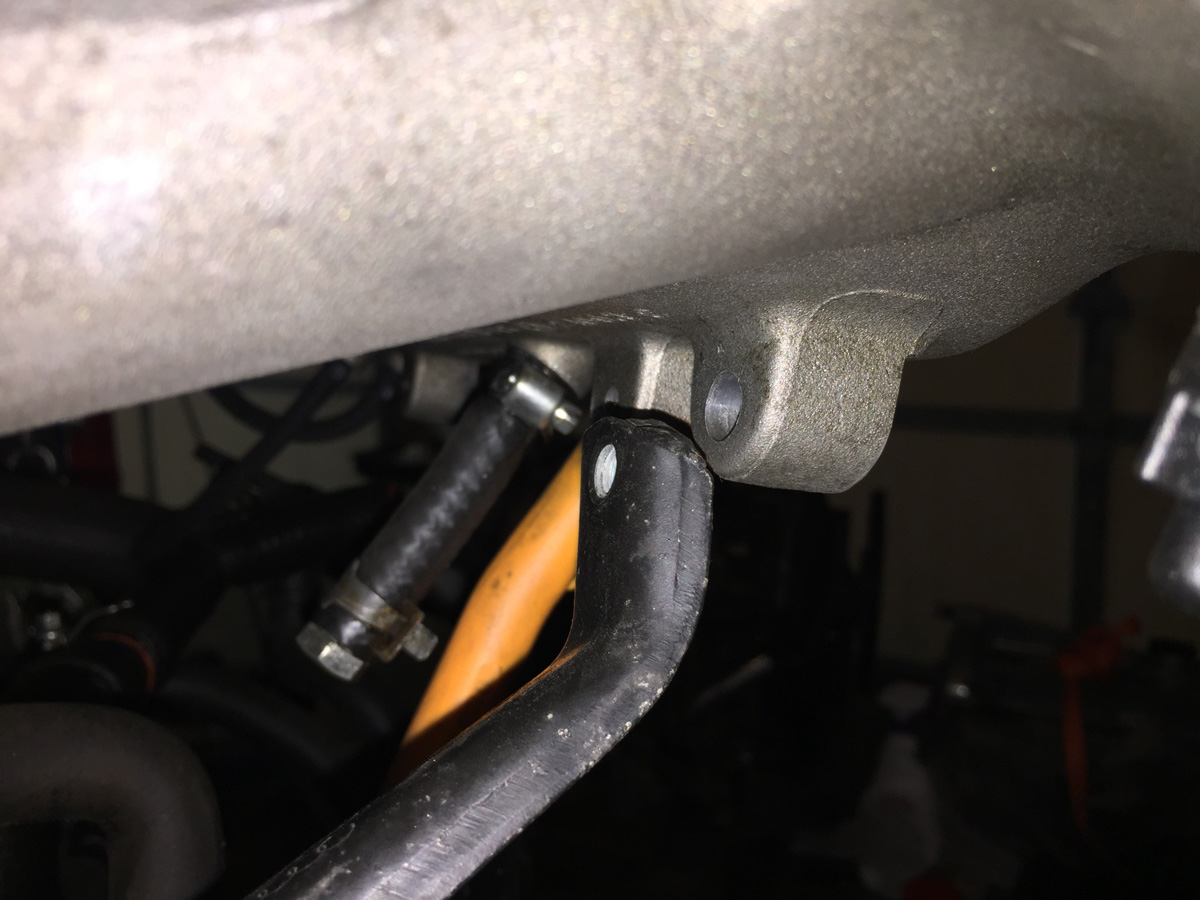
Now the trials and tribulations of cutting one corner (by accident). When rebuilding this engine, I used all new bolts (paying close attention to the TTY bolts). But.... I did not replace the front main seal aluminum plate. I did replace the seal, naturally, but generally, there is no reason to replace the plate.
Unless the bolt holes were stripped by whomever owned the engine previously.
No problem... one size up (7mm to 8mm) on the bolts.
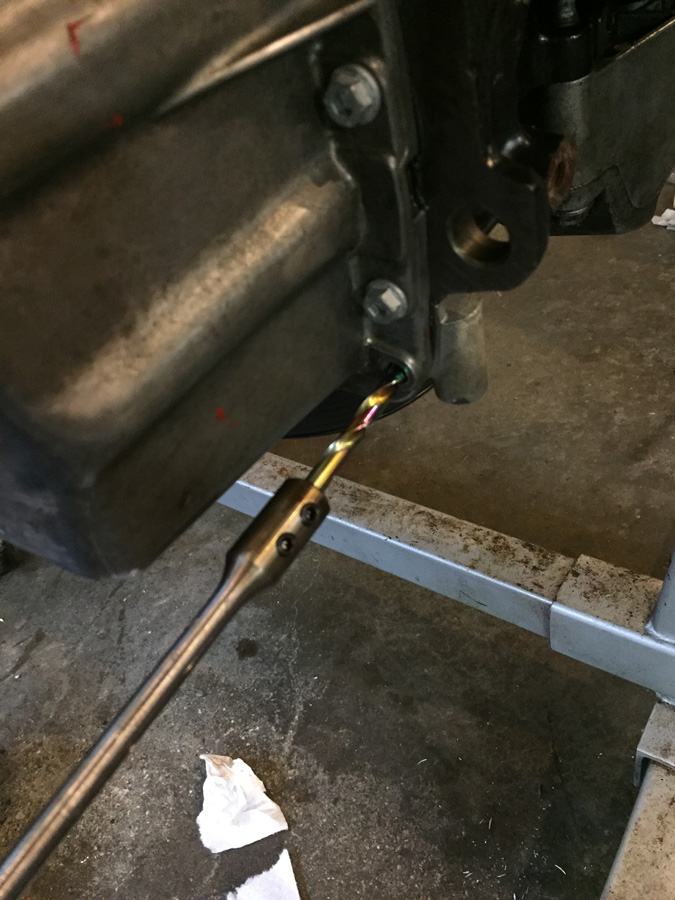
Except, there just had to be a problem. The chuck on the drill would not clear the oil pan. I already applied the sealant to the block and pan and installed the other 18 pan bolts and torqued the three transmission to oil pan bolts. Didn't want to take it apart for the two holes that were stripped on the front main seal plate.
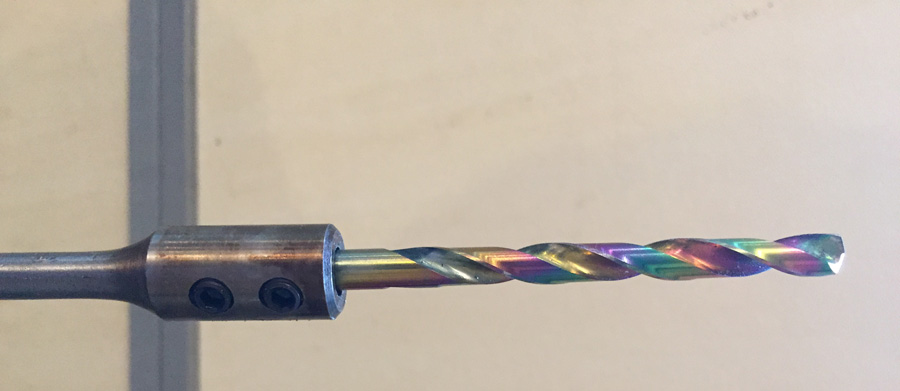
So, I needed to get a longer 17/64" drill bit (what is needed for a 8mm tap) or an extension for the drill. That's what she said!
I could not find a longer drill bit (it is Vermont, ya know), but I found a 12" extension that used two hex set screws to hold in the 1/4 drill bit.
Except mine is 17/64". Doh!
The short version, and three drill bits later, I had to brill a hole in the base of my drill press so that the 12" rod would be low enough to be able to drill into it, drill for a long time with cheap drill bits in hardened steel, and finally get the bit to work with the extension.
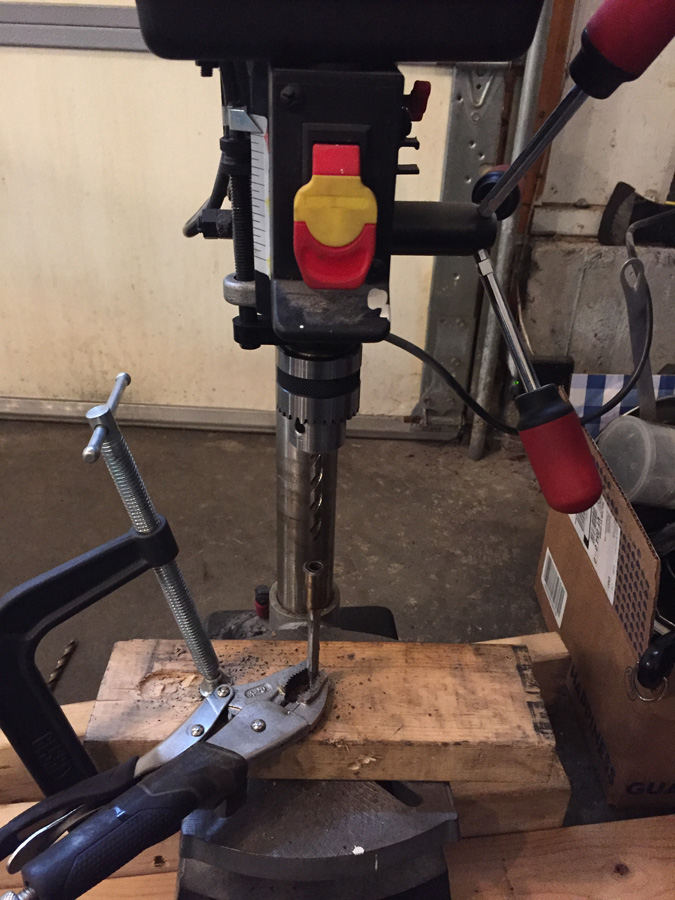
Drilling one of the two holes....
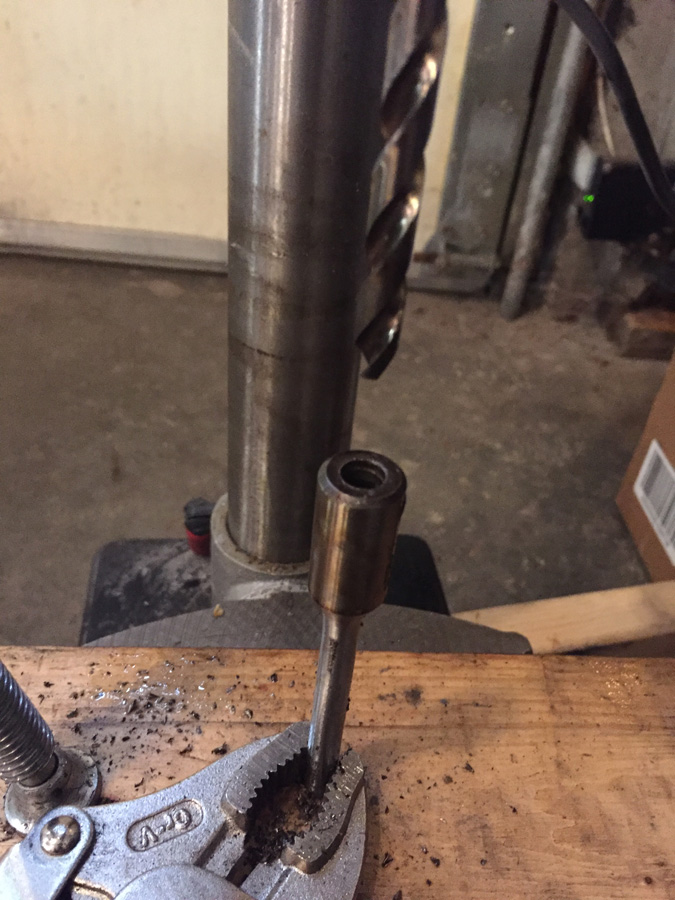
Worked out nicely with the tap as the tap handle that came with the kit did not hold onto the tap very well.
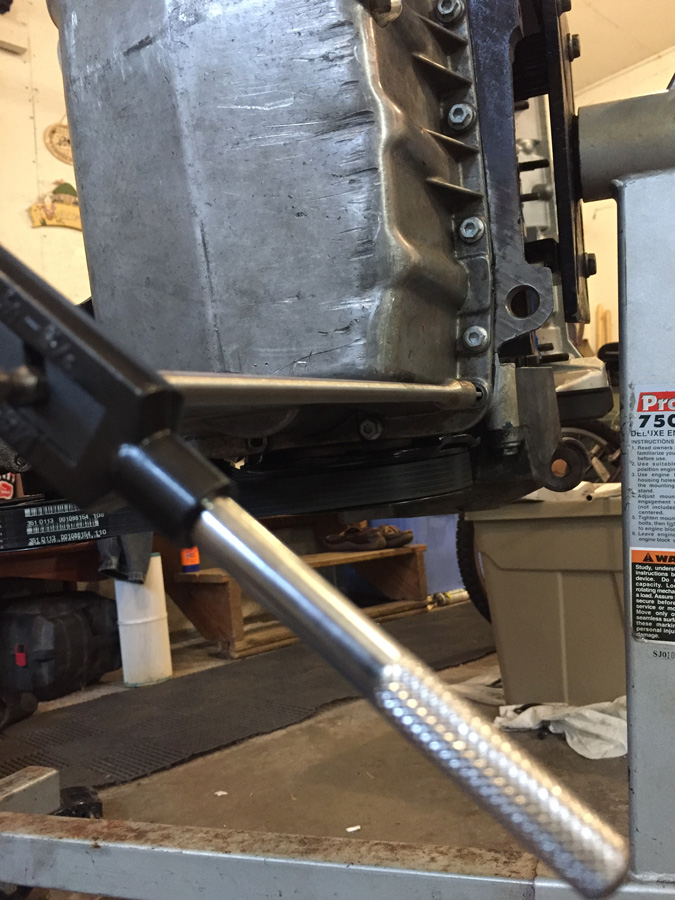
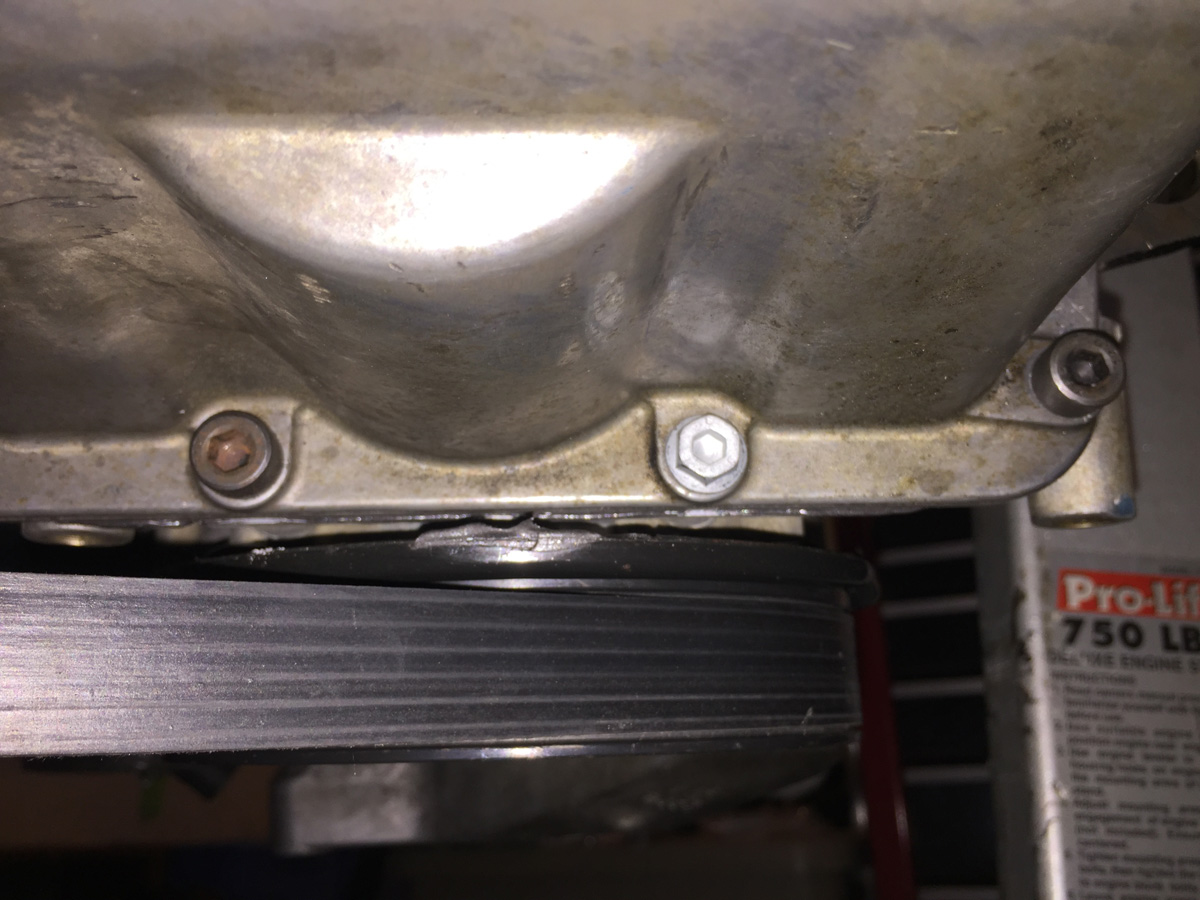
Two 8mm non-TTY bolts holding the oil pan in place much better than the 7mm TTY bolts with threadless holes.
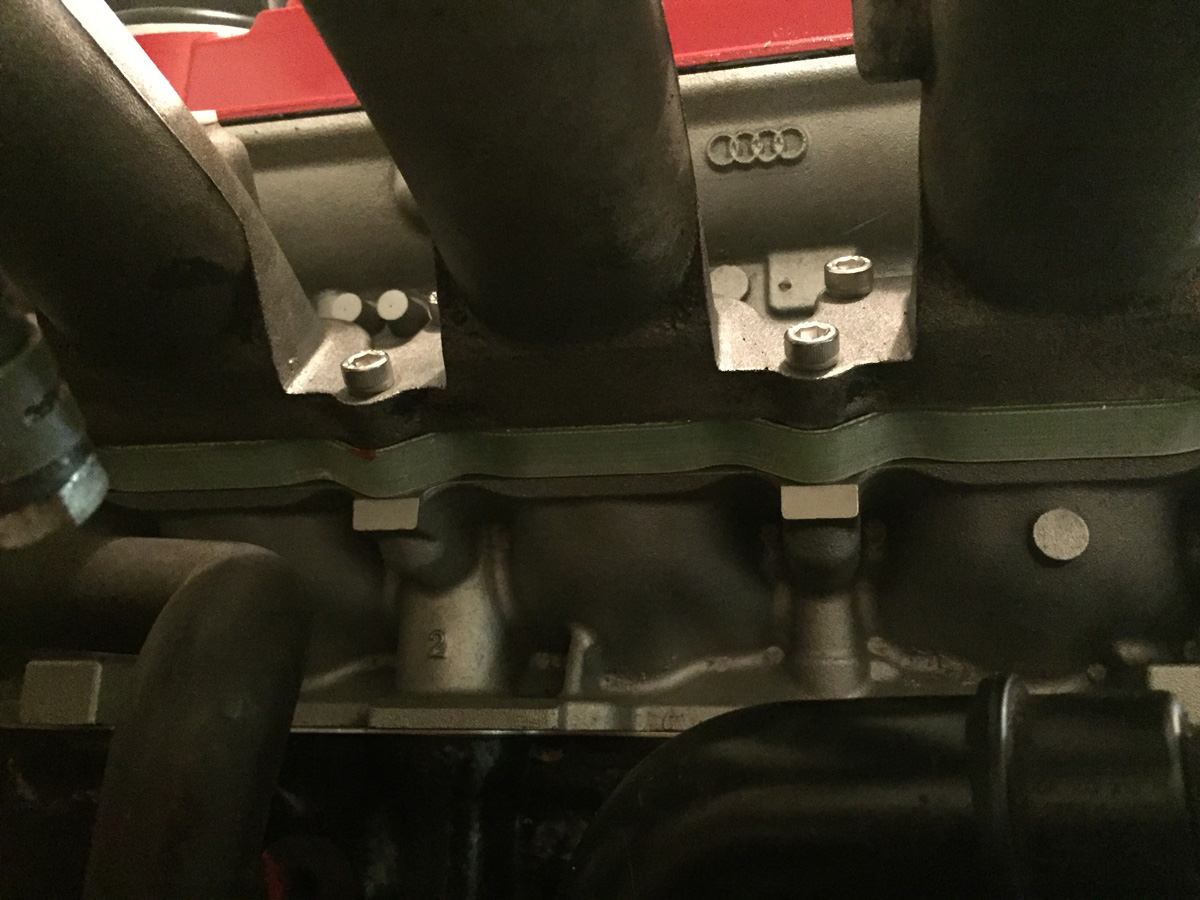
Pretty exhaust side of the engine with new locking nuts. I really like the oblong nuts better than the split locking nuts.
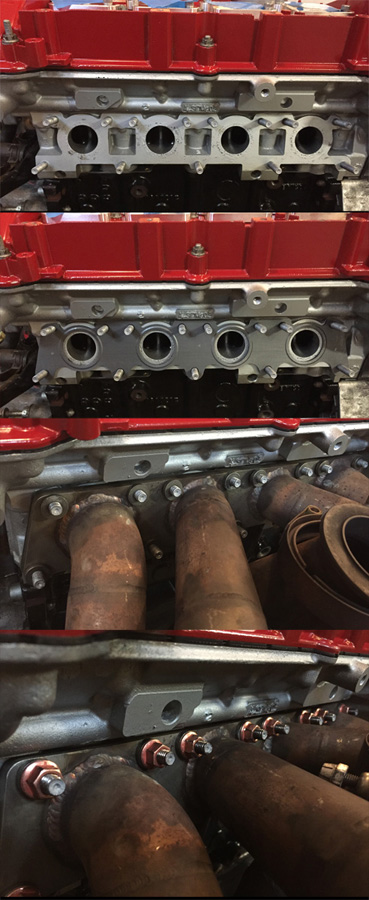
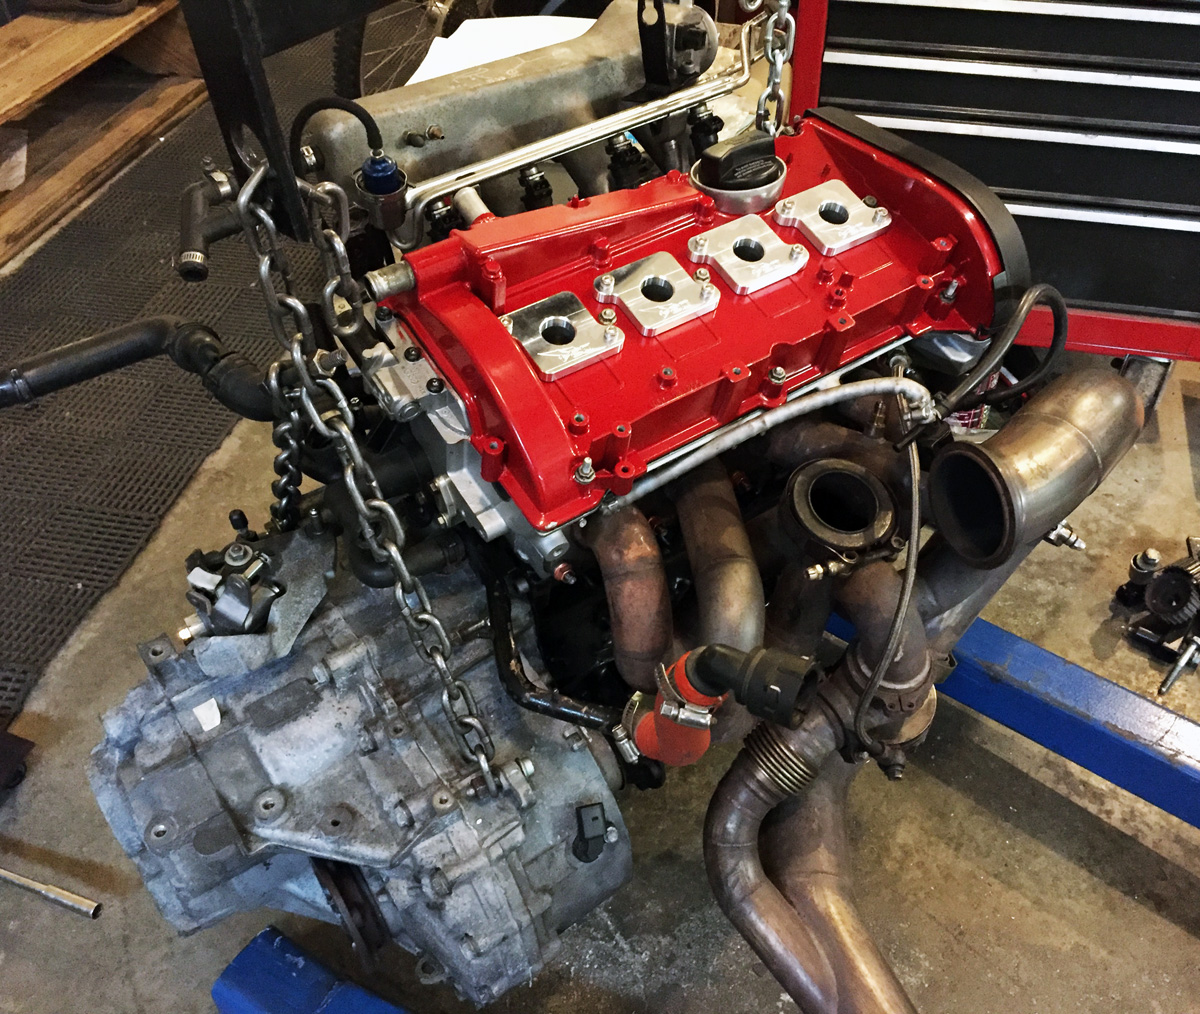
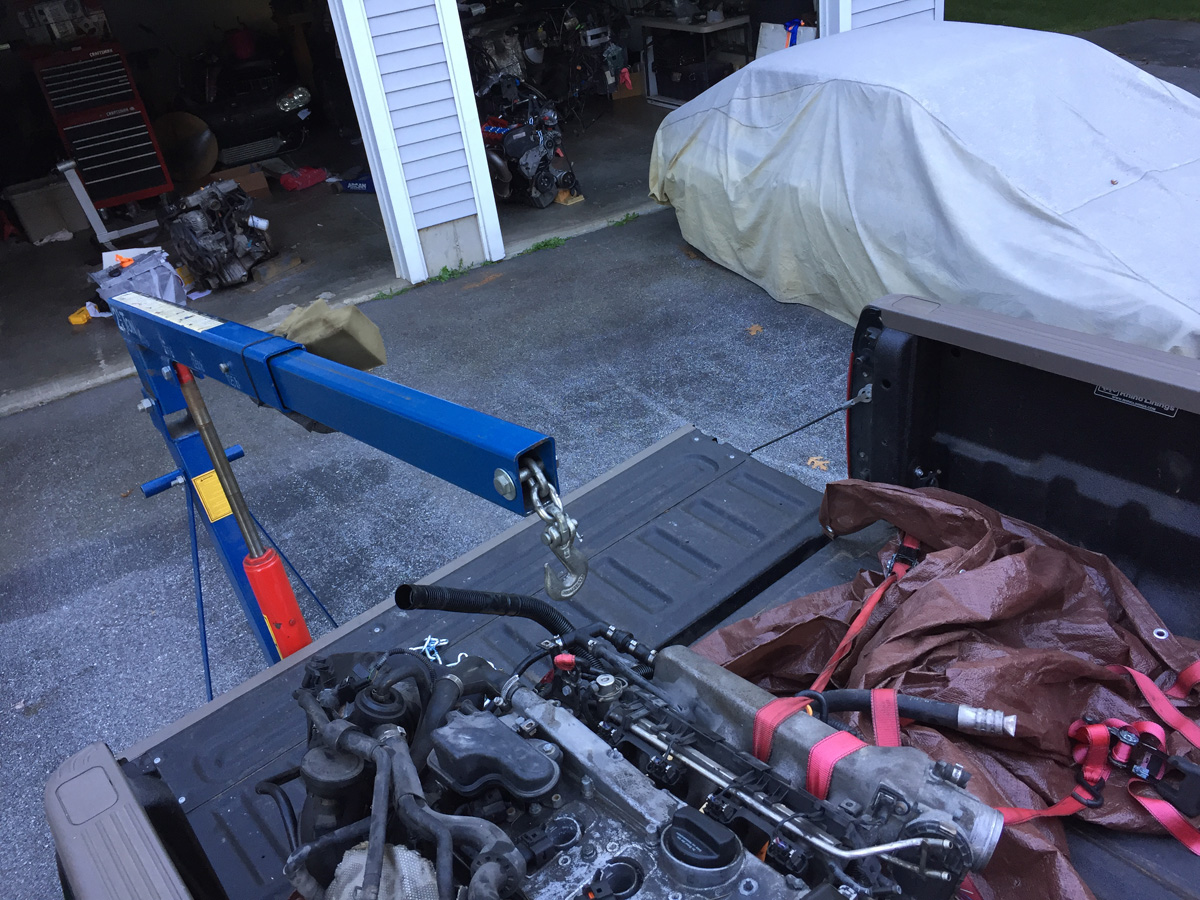
100% together (minus turbo).
Spending time rebuilding an engine with no corners cut... well, one, but that was by accident. I did pay for it.
I had one of these for my Rabbit, but never for the 02J (5-speed) or 02M (6-speed).... that usually involved vice grips and screwdrivers. Enter the proper flywheel holder (not recommended for the crankshaft bolt). Easy to use and very effective.
The new block code is "Grrrr".... no idea what it means, but it seems fitting.
Nothing too exciting from the engine build point of view. Bored the block to accept the .5mm oversized piston (82.5mm vs the standard 82mm), new valve seals, new rings (naturally), and everything was cleaned and machined by http://www.rpmenginesvt.com (Georgia, VT)
Add on the transmission... my new favorite (and easy) way to install the transmission.... unless you have to bolt on the oil pan afterwards (where rotating the engine/trans as a single unit is a royal PITA).
Something new that I am trying... and it led to another series of challenges... is the intake manifold Phenolic spacer. Now, what does Phenolic mean? It is a thermal do-hickey that prevents heat from the engine block from transmitting to the intake manifold. Reduce heat in the intake manifold means more power (there is a reason that we have FMICs!)..... or, it is really good marketing.
One thing I noticed when taking apart the engine is that the fuel injectors were very loose in the injector cups. It was like throwing a hot dog down a hallway.
So, new injector cups were in order along with new rubber o-rings on the injectors.
The kit from 034Motorsports also included longer intake manifold bolts and locking nuts. Shorter stock bolts vs. longer 034 bolts pictured.
All assembled and pretty. While I was there, I had to oversize and tap the holes that held the fuel rail and throttle cable holder (another do-hickey) as the 7mm holes in the aluminum intake were less than threaded.
Showing the thickness of the spacer. At least 300 more wHP, I figure. Throw in some stickers and that is 305 wHP more! Mother of God! (Super trooper reference)
Sad part, the internet must have an end.... search for "Mother of God" and it just starts repeating on Google.
Anyway, back at the ranch....
New challenge with the spacer is that the bracket that holds the intake manifold in place, something that I have not used for years, but figured the additional leverage from the extended mounting point with the spacer would warrant it, does not line up anymore. English teacher would have shot me for that terribly assembled sentence. Oh well.
Also, at Ascutney #1 (2016), I dumped a bit of oil on my skid plate because the plastic oil dipstick was dislodged (or was never correct pushing into place). I haven't used the stock dipstick holder down do-hickey thing-ah-mabob for years. Something else I was going to solve while putting the engine back together.
Image of the stock holder-downer thingy. It is quite long as it holds various electronic bits, emissions VTAMs, blacks tubes, and other various things that I do not need. VTAM is an old IBM term for those of you playing the home game. I mounted the stock brace (that I had to grab from a junk car recently as I discarded mine years ago) to give me some ideas of what I could do. The right most bolt is currently in service holding the Kales Custom oil separator. I could use the stock bracket and the oil separator with the stock bolt, but all I needed was something simple to hold down a flimsy plastic tube. Enter Mr. Hacksaw and Mrs. Dremel.
Longer bolt installed with aluminum spacer. I had to flatten out the brace a bit to extended it and then bend the end so that the bolt hole would align with the hole on the intake.
Cut down the bracket for the dip stick....
Now the trials and tribulations of cutting one corner (by accident). When rebuilding this engine, I used all new bolts (paying close attention to the TTY bolts). But.... I did not replace the front main seal aluminum plate. I did replace the seal, naturally, but generally, there is no reason to replace the plate.
Unless the bolt holes were stripped by whomever owned the engine previously.
No problem... one size up (7mm to 8mm) on the bolts.
Except, there just had to be a problem. The chuck on the drill would not clear the oil pan. I already applied the sealant to the block and pan and installed the other 18 pan bolts and torqued the three transmission to oil pan bolts. Didn't want to take it apart for the two holes that were stripped on the front main seal plate.
So, I needed to get a longer 17/64" drill bit (what is needed for a 8mm tap) or an extension for the drill. That's what she said!
I could not find a longer drill bit (it is Vermont, ya know), but I found a 12" extension that used two hex set screws to hold in the 1/4 drill bit.
Except mine is 17/64". Doh!
The short version, and three drill bits later, I had to brill a hole in the base of my drill press so that the 12" rod would be low enough to be able to drill into it, drill for a long time with cheap drill bits in hardened steel, and finally get the bit to work with the extension.
Drilling one of the two holes....
Worked out nicely with the tap as the tap handle that came with the kit did not hold onto the tap very well.
Two 8mm non-TTY bolts holding the oil pan in place much better than the 7mm TTY bolts with threadless holes.
Pretty exhaust side of the engine with new locking nuts. I really like the oblong nuts better than the split locking nuts.
100% together (minus turbo).
Go Fast VW & Audi parts at FastAddiction.com
-
Rabbit Farmer
- Posts: 2260
- Joined: Wed Jun 25, 2003 11:37 pm
- AntiSpam: No
- Location: Earth
- Contact:
Re: Rabbit Farmer's various VW Projects
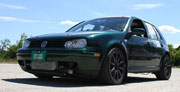
A little progress.... on the Scirocco!
I picked up a 1.8T AEB engine (block is 058.... intermediate shaft for external water pump), mainly because the Scirocco has an AEB and I figured it would be easier to work on the Scirocco if I had another engine that was exactly the same.
Then I got to looking at the new engine and realized it was quite different from the 06A that I run in the Golf. No biggy. I was not sure if the intermediate shaft was going to affect my plans for the engine build.
So.... just in case... since the junkyard had a 1.8T 06A block style engine for cheap (the 1.8Ts are getting old, so things are cheap, though, hard to come by), I grabbed it. There is still on more 1.8T in the yard.... in a Passat, though it was not an AEB.
Still planning to use the AEB head on the 06A block.
Jumping into the Scirocco shortly after the Mt. Philo hillclimb.
Now on the Golf.... two issues that I have had with the Golf. She is a little slow (not too slow) building up the boost for short distances (corner to corner), but was great once it was full boost. AND.... the bolts on the hot side of the turbo would back out.
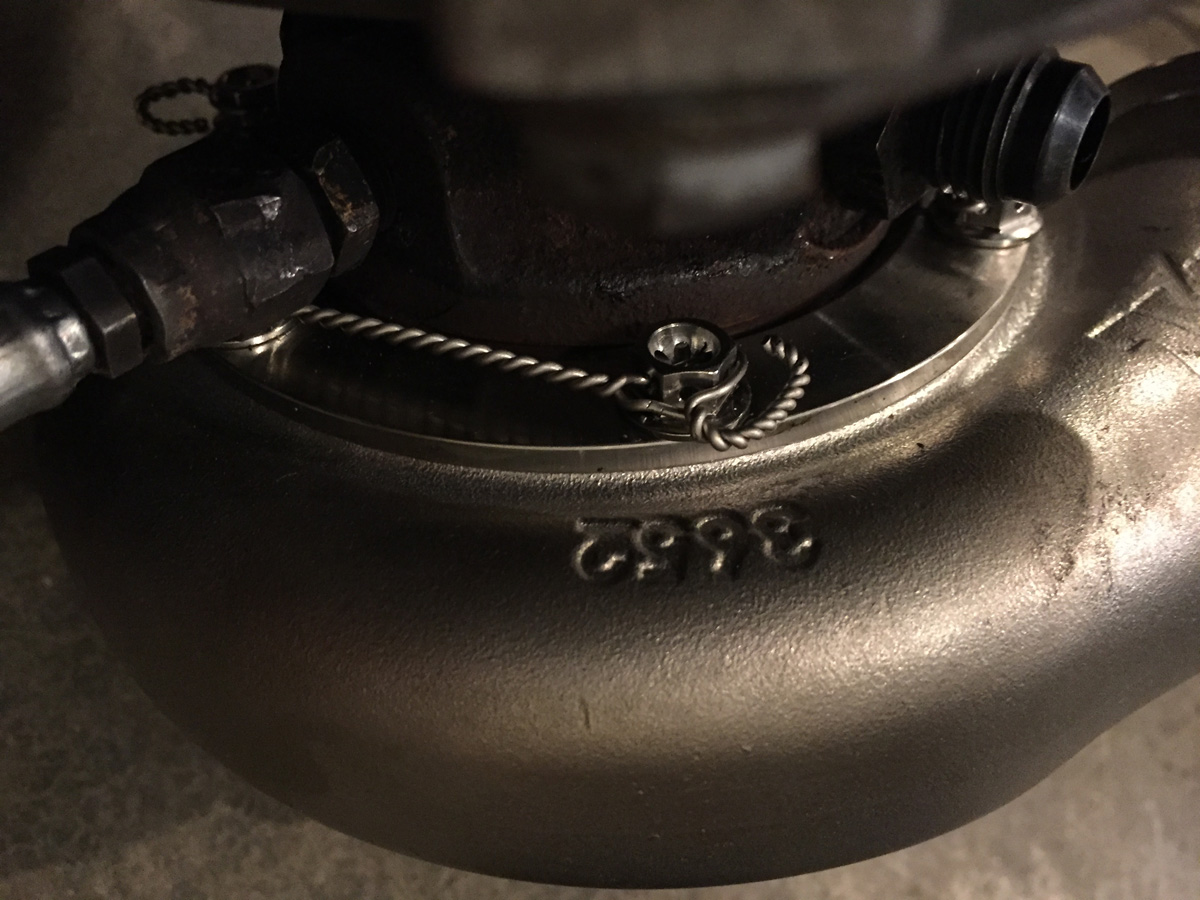
Enter the Tial 3652 and exit the Tial 6852 turbine housing.
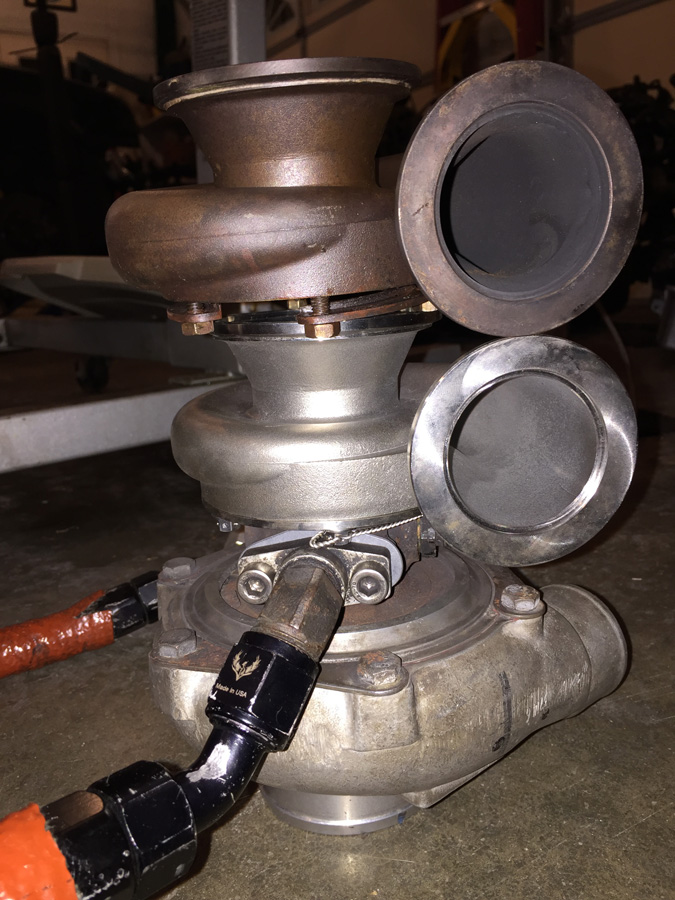
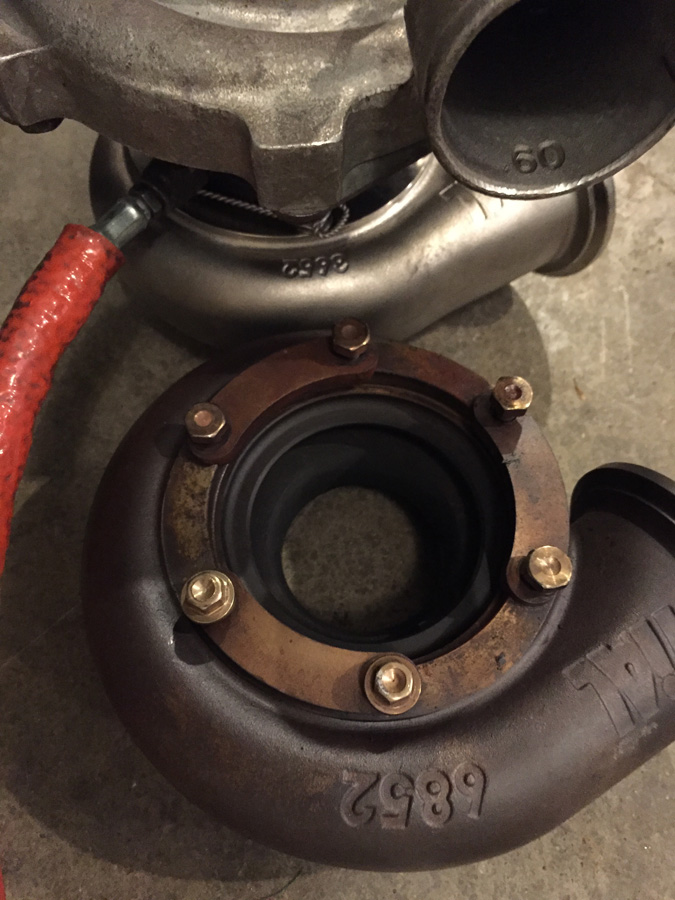
To address the potential for loose bolts, Joey at KalesCustom.com installed in SS bolts (pre-drilled holes for safety wire) and installed safety wire. So there!
Putting the engine back in the Golf this week (maybe.... have to get ready for the Mt. Philo hillclimb.... sans the Golf) or next.
Then time to play with ideas for the Scirocco and start working on the engine.
I picked up a 1.8T AEB engine (block is 058.... intermediate shaft for external water pump), mainly because the Scirocco has an AEB and I figured it would be easier to work on the Scirocco if I had another engine that was exactly the same.
Then I got to looking at the new engine and realized it was quite different from the 06A that I run in the Golf. No biggy. I was not sure if the intermediate shaft was going to affect my plans for the engine build.
So.... just in case... since the junkyard had a 1.8T 06A block style engine for cheap (the 1.8Ts are getting old, so things are cheap, though, hard to come by), I grabbed it. There is still on more 1.8T in the yard.... in a Passat, though it was not an AEB.
Still planning to use the AEB head on the 06A block.
Jumping into the Scirocco shortly after the Mt. Philo hillclimb.
Now on the Golf.... two issues that I have had with the Golf. She is a little slow (not too slow) building up the boost for short distances (corner to corner), but was great once it was full boost. AND.... the bolts on the hot side of the turbo would back out.
Enter the Tial 3652 and exit the Tial 6852 turbine housing.
To address the potential for loose bolts, Joey at KalesCustom.com installed in SS bolts (pre-drilled holes for safety wire) and installed safety wire. So there!
Putting the engine back in the Golf this week (maybe.... have to get ready for the Mt. Philo hillclimb.... sans the Golf) or next.
Then time to play with ideas for the Scirocco and start working on the engine.
Go Fast VW & Audi parts at FastAddiction.com
-
Rabbit Farmer
- Posts: 2260
- Joined: Wed Jun 25, 2003 11:37 pm
- AntiSpam: No
- Location: Earth
- Contact:
Re: Rabbit Farmer's various VW Projects
Let's talk spark plugs.
All I "know" about them is what I read on the internet. Opinion and marketing, really.
What I think I have captured is that copper dissipates heat better than other plugs.
I was running Bosch F6DTC (one step cooler than stock) for many years, but found that they foul frequently. I changed them often during the year. A comparable plug (same heat range) seems to be the NGK BKR7E.
I was also looking at the Bosch FR5DTC (two steps cooler than stock.... Bosch numbers decrease for cooler heat range).
Both of the Bosch plugs have multi prongs.... good or bad?
And a another plug that I was looking at is the Bosch F5DPOR. Cooler, platinum, and supposedly dissipates heat like a cooper.
I found a lot of this "opinion" here:
http://myfastgti.com/volkswagen/threads ... Range-Info
I am NOT married to any brand of plug.
I have found sites that state that mild upgrades should go 1 step cooler and crazier upgrades 2 steps cooler.
Fact or opinion.
Any suggestions?
Thanks
Steve
Go Fast VW & Audi parts at FastAddiction.com
-
Rabbit Farmer
- Posts: 2260
- Joined: Wed Jun 25, 2003 11:37 pm
- AntiSpam: No
- Location: Earth
- Contact:
Re: Rabbit Farmer's various VW Projects
I am working on the wiring in the Golf.... removing all the non-essential stock wiring, stereo (gasp!), and moving the window switches to the center.
I do not plan to use the stock window switches as I will use new toggle switches. But.... I don't know what they are called for my needs.
The current window switch is down, up, auto-up, and auto-down. This means that if I pull back (down) on the switch, the window will move until I release the button. If I pull it all the way back, it does an auto-down.
What kind of toggle switch would I search for?
I am still in the kiddie pool when it comes to electronics... water wings and all.
Thanks
Steve
Go Fast VW & Audi parts at FastAddiction.com
Re: Rabbit Farmer's various VW Projects
DPDT-double pull double throw-momentary contact.
Translating road racing to hillclimbing:
Proper tire selection== nothing hooks up on moss or wet leaves.
Staying on the racing line==anything paved is considered good.
Proper tire selection== nothing hooks up on moss or wet leaves.
Staying on the racing line==anything paved is considered good.
-
Rabbit Farmer
- Posts: 2260
- Joined: Wed Jun 25, 2003 11:37 pm
- AntiSpam: No
- Location: Earth
- Contact:
Re: Rabbit Farmer's various VW Projects
Thx. Off to the internet to find a style of double pole double throw switches that I like. Big help!
Go Fast VW & Audi parts at FastAddiction.com
